The goal is to show how to make pretty figures of MOs from Gaussian computations using GabEdit.
This is a write-up for a colleague whom is using Windows. The GabEdit bits work pretty much the same way on linux, although the povray stuff is a lot easier (in my opinion anyway) on that OS.
This is a write-up for a colleague whom is using Windows. The GabEdit bits work pretty much the same way on linux, although the povray stuff is a lot easier (in my opinion anyway) on that OS.
Anyway, Windows it is.
A. Optional: Install Gaussian (G09W)
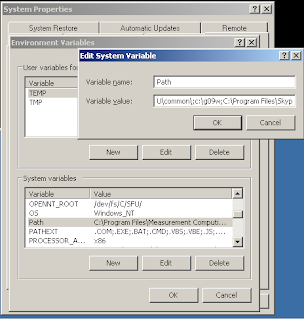
If you have G09W you can install it. To use the formchk utility, add the location of your gaussian installation to path.
Do this by right-clicking on My Computer, select the Advanced tab, click on Environment Variables, and then click on the Path entry under System Variables. Click Edit, and add
;c:\g09wif that's the correct path for you. The ";" is just to separate your entry from the previous one. If you need to add another entry afterwards (e.g. for povray), put a ";" after c:\g09w

Either way it's optional, as you will likely have access to formchk on the same computer/system that you ran your job on and can do the chk -> fchk conversion there.
Also, using formchk on a windows computer on a .chk file from a linux computer might not work (which was my case)
An alternative is to set up a smallish linux VM: https://verahill.blogspot.com.au/2016/08/631-small-linux-installation-in.html
B. Optional: Add option to open terminal using mouse
Following this: https://stackoverflow.com/questions/378319/windows-explorer-command-prompt-here/379804
Create a plain text file called context.reg

Edit it and put the following in it:
Windows Registry Editor Version 5.00
[HKEY_LOCAL_MACHINE\SOFTWARE\Classes\Folder\shell\cmd]
@="Open Command Prompt Here"
[HKEY_LOCAL_MACHINE\SOFTWARE\Classes\Folder\shell\cmd\command]@="cmd.exe /k pushd %L"
 |
| Like so... |
 |
| Yes! |
 |
| Open terminal here |
C. Install gabedit
Got to https://sites.google.com/site/allouchear/Home/gabedit/download and get "The Gabedit installer for Windows (OpenGL)"
Run. It's that easy.
When running gabedit for the first time you may be asked lots of questions. You can probably just accept all the defaults. We'll change some of them below.
D. Install povray
Download http://www.povray.org/redirect/www.povray.org/ftp/pub/povray/Official/povwin-3.7-agpl3-setup.exe and also accept to install the editor dlls at the end of the installation.
 |
| Download povray |
;C:\Program Files\POV-Ray\v3.7\bin
 |
| Like So |
Let's get going!
1. Optional: Convert chk to fchk using formchk
Didn't work for me, but you can always try (I convert the files under linux)
Either way, you must have the fchk file before going to gabedit

2. Open fchk file in gabedit
You need to do a bit of setting up:
Set path and command for povray


To look at the fchk file:
a) Go to Display
 |
| Display Geometry/Orbitals/Density/Vibration |
b) unset dipole (because otherwise you'll have an annoying arrow in your figure)
 |
| Untick dipole |
c) Set desired atom colours.
In particular, I change N from dark blue to light blue so that it doesn't interfere with the orbital colours.
 |
| Atom colour |
d) Set backgrounds (povray and screen) to white
 |
| Povray background |
 |
| Window background |
e) load fchk file
 |
| Go to Orbitals/Gaussian fchk |
 |
| Open your fchk file |
f) Set ball/stick parameters
 |
| Set Ball and Stick parameters |
 |
| Apply |
g) select level/MO
 |
| Note that you get the alpha OR beta orbitals. For a spin restricted system these are the same (apart from signage) |
 |
| You should edit number of points. 65 is the default. 80 is slow but manageable. 90 is pushing it. Higher = smoother. |
 |
| Computing... |
 |
| "Get Isovalue" almost never works properly. Try 0.04-0.06. |
 |
| Et voilá! |
 |
| Selection |
h) Edit surfaces
You can change colours and transparency
 |
| Transparency is an option |
 |
| Adjust the transparency/opacity here |
To make a publication-worthy figure, export as pov
 |
| Export as Povray |
Edit the command to +A0.01 instead of +A0.3 for less 'pixelated' figure on zooming in. Takes a bit longer to render though. The H/W values depend on your window shape.
 |
| Select save, not Run |
3. Render povray
You now have a pov file (example.pov). The most straight-forward way to render it is to open the command prompt (terminal) in the same folder and run
pvengine +A0.01 +H604 +W620 example.pov
 |
| Rendering |
assuming that the H/W values are the ones listed (or multiples of them) when you saved the pov file (it'll be listed in example.bat in the same folder).
And it looks like this:
 |
| A basic POV-Ray generated png |
You can also run the .bat file associated with the pov file, but note that you'll have to put paths in "":
| You need ""s |
 |
| Povray editor |
 |
| Render Settings |
 |
| The issue becomes the default H/W (resolution) values. Override using command line options: +HXXX +WYYY |
 |
| Edit -- but you'll be told that there's no program |
 |
| Select a program to open |
 |
| pvengine |
 |
| Always use the selected program |
ConversionConversion EmoticonEmoticon